THE AGONY PLANT'S GUIDE TO REPOTTING
As Spring comes around and our houseplants begin to wake up from their wintery slumber, one of the very best things you can do for them is a good repotting. It's not the tidiest of jobs but is definitely the one your green pals will thank you for the most.
We repot for a number of reasons. As plants grow, you are eventually going to need to put them into a bigger pot to help keep them on the right track and to prevent them from becoming pot-bound (no one likes a cramped living space). Even if you're not looking to move up a pot size, a re-dressing of soil or a shiny new pot is a great way to give you plant babies a little sprucing up.
It's also one of our top pieces of advice for tackling no end of ills, including getting rids of certain pests (we're looking at you fungus gnats), root rot and revitalising seemingly inexplicably sad looking plants.
So, how to do it? As we said, it's not a particularly tidy job, and if you're limited on space it can be a particularly daunting tasks, but our step-by-step guide packed full of tips is here to help!
WHEN TO DO IT?
Spring is best. Your plants will just be entering their growing period, so they'll be able to best reap the benefits from that lovely fresh soil all the way through to Autumn when they tend to enter dormancy again. For young plants, we recommend repotting once a year, and for larger, more-establishing ones, two years should do it, or when they are starting to look a bit unwieldy.
We always recommend doing a few at the same time too - it means you only have to tidy up once and that you're less likely to be left with half-used bags of potting soil kicking about.
WHAT DO I NEED?
- A table to work on and some newspaper to keep it tidy if needed
- Good quality potting soil, fresh pots and tools (some gloves, a trowel and some clean sharp secateurs or a knife should do).
- Your plants!
And we're ready!

1. Give your plant a light water to help the root ball and soil slide out of its current pot more easily.
2. Carefully remove the plant but turning the pot on its side. Support the main stem in one hand and use the other to gently pull the pot away, always being careful that you are pulling the pot and not the stem. If needed, gently tap the pot to help, or use your trowel to move some of the soil. If you have a rooty mess coming out of the bottom of the pot, tease them apart gently until the pot loosens off.

3. Once the plant is out of its first pot, give the root ball a once over. If the soil is in good shape try not to disturb it too much. If the soil is looking rotten or spent, gently knock it away (but be careful not to agitate roots too much). Gently loosen off any particularly tight looking roots, and remove any dead or rotting ones with a clean, sharp knife or pair of secateurs or knife.

4. Make sure your new pot is nice and clean. If you're plant doesn't need a bigger pot, you can put it back in the original one, just make sure you give the pot a good clean in hot soapy water first, and knock off a little more soil from the root ball and trim about a quarter off the roots before putting it back.
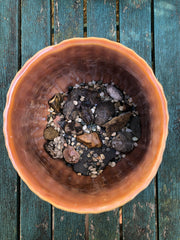
5. We're ready to pot! Firstly, add drainage. This is especially important if your pot doesn't have a drainage hole. You can use specially designed clay drainage balls, broken bits of crockery, pebbles, gravel - anything that'll create a bit of space for water to drain away from the soil into.
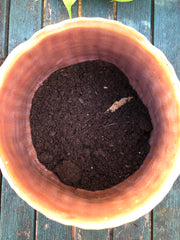
6. Add some soil - just a little at the bottom at this point, you want to leave space to position your root ball on top of this plus about 2cm at the top.
7. Position your plant, making sure your plant is central and upright. If you're adding new supports like a bamboo cane or moss pole, now is the time - position it in the gap between the root ball and pot to get as secure as possible without pushing through the roots.

8. Add potting soil around the plant, gently firming down as you go until it is happily in place. Don't go any higher than it was before - you want to add soil to the bottom of the plant not the top of it.

9. Water it well - this will help your newly repotted plant settle in to its new home. This is also a good moment to give it once over above the pot - trim any broken or dead bits away, give it a spritz and clean your plant up - dusting the leaves does it a world of good.
10. After it's had a good drink and time to settle down, check in to see if any more soil needs adding to the top.
11. Enjoy! Good luck and keep it green!
